
Classic Key Lime Pie
There are few desserts that capture the feeling of summer quite like a classic key lime pie. One bite — the cool, silky filling, the bright tartness of the lime, the buttery crunch of the graham cracker crust, and a cloud of softly whipped cream on top — and you are instantly somewhere warm, somewhere with sunshine and a sea breeze, even if you are actually eating it in your kitchen on a grey afternoon. It is one of those rare desserts that is both refreshing and indulgent at the same time, and it has been a favourite in our house for years.
I first tasted a proper key lime pie on a holiday in Florida, in a small café where the owner made it every morning and served it with a pile of whipped cream that nearly hid the slice underneath. I had expected something like a lemon meringue pie, but it was completely different — smoother, creamier, and with a sharper, more aromatic lime flavour that lingered pleasantly after each bite. I asked for the recipe, and the owner laughed and told me there was hardly a recipe at all: a tin of condensed milk, egg yolks, lime juice, and a biscuit crust. Four ingredients, fifteen minutes in the oven, and the fridge does the rest.
She was right, and that simplicity is exactly why this pie has become one of my most-made desserts. There is no pastry to roll, no complicated technique, and no chance of it going wrong in any dramatic way. You press crumbs into a dish, whisk together three ingredients, pour, bake briefly, and chill. The hardest part is waiting for it to set in the fridge, and even that is only a few hours. If you have never baked a pie before, this is the one to start with — it is almost impossible to get wrong, and it looks and tastes like you spent far longer on it than you did.
What makes it a true key lime pie, rather than just a lime pie, is the key lime itself. Key limes are smaller, rounder, and more aromatic than the regular limes you find in most supermarkets, with a sharper, more floral tartness. If you can find them, or find bottled key lime juice, use it — the flavour is genuinely different and worth seeking out. If you cannot, regular limes make a very good pie too, and I will explain exactly how to adapt the recipe. Either way, you will end up with a dessert that is bright, creamy, and completely irresistible. Let me show you how to make it.
Why You’ll Love This Recipe
The first reason to love key lime pie is how easy it is. The filling has just three ingredients — sweetened condensed milk, egg yolks, and lime juice — and you whisk them together in a single bowl in about two minutes. The crust is crushed biscuits mixed with melted butter, pressed into a dish. The whole thing bakes for fifteen minutes, then chills in the fridge. From start to finish, you will spend less than twenty minutes actively working, which makes it one of the simplest pies you will ever make.
The second reason is the flavour, which is genuinely special. The filling is silky and creamy from the condensed milk, with a bright, sharp lime flavour that cuts through the sweetness perfectly. It is not sour, and it is not overly sweet — it sits in that perfect middle ground where every bite makes you want another. The graham cracker crust adds a buttery, slightly salty crunch that contrasts beautifully with the smooth filling, and the whipped cream on top softens everything into a dessert that feels light even though it is rich.
This pie is also a wonderful make-ahead dessert. It needs at least four hours in the fridge to set, and it is even better made the day before, so it is perfect for dinner parties, summer barbecues, and holiday meals, when you want dessert sorted well in advance. It travels well in its dish, it slices into neat wedges, and it looks beautiful on the table with a pile of whipped cream and a few thin slices of lime on top. It is the kind of dessert that makes guests ask for the recipe.
Finally, it is a crowd-pleaser in a way that few desserts are. Children love it because it is sweet and creamy, adults love it because it is not too heavy after a big meal, and it suits almost any occasion, from a casual family dinner to a summer celebration. If you are looking for a dessert that is impressive, refreshing, and practically foolproof, this is the one. And if you enjoy desserts that are elegant without being fussy, this classic vanilla bean panna cotta is another make-ahead favourite with the same relaxed, chill-and-serve ease.
Ingredients You’ll Need
- For the graham cracker crust:
- 200 g (about 1 1/2 cups) graham cracker crumbs, finely crushed
- 75 g (about 5 tablespoons) unsalted butter, melted
- 50 g (about 1/4 cup) granulated sugar
- 1/4 teaspoon fine sea salt
- For the filling:
- 4 large egg yolks
- 1 can (397 g / 14 oz) sweetened condensed milk
- 120 ml (about 1/2 cup) key lime juice, freshly squeezed or bottled
- 1 tablespoon key lime zest, finely grated
- 1 pinch fine sea salt
- For the topping:
- 300 ml (about 1 1/4 cups) double cream, cold
- 2 tablespoons icing sugar
- 1 teaspoon vanilla extract
- Thin lime slices and extra zest, to decorate
How to Make Classic Key Lime Pie
Start by heating the oven to 175°C (160°C fan / 350°F) and getting your pie dish ready — a standard 23 cm (9 inch) pie dish works perfectly. To make the crust, crush the graham crackers into fine crumbs. A food processor makes this quick and easy, but a sealed bag and a rolling pin work just as well and are oddly satisfying. You want the crumbs fine and even, like sand, with no large pieces left, because fine crumbs pack together into a firm crust while coarse crumbs fall apart when you slice the pie.

Tip the crumbs into a bowl and stir in the sugar and salt, then pour in the melted butter and mix until the crumbs are evenly coated and the mixture looks like wet sand. It should hold together when you squeeze a handful — if it feels too dry and crumbly, add another tablespoon of melted butter. Tip the mixture into the pie dish and press it firmly and evenly across the base and up the sides, using the bottom of a glass or a measuring cup to get it smooth and compact. Pay special attention to the corners where the base meets the sides, pressing the crumbs in firmly so the crust does not crumble when you serve it.
Bake the crust for eight to ten minutes, until it smells toasty and looks a shade darker around the edges. This short bake firms up the crust and keeps it crisp under the filling, so do not skip it. Take it out of the oven and let it cool for ten minutes while you make the filling. Turn the oven down to 160°C (150°C fan / 325°F) for the filling bake — the gentler heat sets the custard slowly and keeps it silky rather than rubbery.
For the filling, whisk the egg yolks in a large bowl for about a minute until they turn pale and slightly thick. This step matters more than it seems: whisking the yolks well helps the filling set into a smooth, creamy texture rather than a dense one. Pour in the sweetened condensed milk and whisk until completely combined, then add the lime juice, lime zest, and salt, and whisk again until the mixture is smooth and slightly thickened. You will notice it thickens almost immediately when the lime juice hits the condensed milk — that is the acid reacting with the milk proteins, and it is completely normal. It is also why this pie sets so reliably.
Pour the filling into the cooled crust and smooth the top with a spatula. Bake for fourteen to sixteen minutes, until the edges are set but the centre still wobbles gently when you nudge the dish. The centre should jiggle like a jelly, not slosh like liquid — if it sloshes, give it another two minutes. Take the pie out of the oven and let it cool to room temperature on a wire rack, which takes about an hour, then cover it loosely and refrigerate for at least four hours, and preferably overnight. The long chill is what turns the filling from a soft custard into a firm, sliceable pie, so do not rush it.
Just before serving, whip the double cream with the icing sugar and vanilla extract until soft peaks form — the cream should hold its shape when you lift the whisk, but still look soft and billowy rather than stiff. Spoon or pipe the cream over the top of the pie, leaving a little of the green filling visible around the edges, and decorate with thin lime slices and a scattering of zest. Slice with a sharp knife dipped in hot water and wiped clean between cuts, and serve cold. If you like desserts that slice into neat, satisfying portions, these easy apple pie bars with streusel are another favourite — buttery, spiced, and just as easy to share.
Tips for Perfect Key Lime Pie
The most important tip is to use real key limes or bottled key lime juice if you can find them. Key limes are smaller and more aromatic than regular limes, with a sharper, more floral flavour that is the signature of this pie. In many places they are sold in bags in the produce section, or you can find bottled key lime juice in the baking aisle or online. If you cannot find either, regular limes make a very good pie — use the same amount of juice and add a little extra zest to make up for the milder flavour. Avoid bottled regular lime juice, which often tastes flat and slightly bitter.
Do not overbake the filling. The pie is done when the edges are set and the centre still wobbles gently — it will firm up completely as it chills. Overbaking makes the filling rubbery and can cause it to crack, and there is no way to fix that once it happens. Fourteen to sixteen minutes is usually right, but ovens vary, so start checking at thirteen minutes and trust the wobble test rather than the clock. Remember that the pie keeps cooking slightly from residual heat after it comes out of the oven.
Chill the pie thoroughly before slicing. Four hours is the minimum, and overnight is genuinely better — the filling needs that time to set firmly enough to slice cleanly. A warm or barely chilled pie will be soft and runny when you cut into it, no matter how perfectly you baked it. If you are short on time, you can speed the cooling slightly by placing the pie in the fridge uncovered for the first hour, then covering it loosely, but do not be tempted to put it in the freezer, which can make the filling grainy.
Press the crust firmly and evenly into the dish, especially at the corners. A loosely pressed crust will crumble when you slice the pie, while a firmly pressed one holds together beautifully. Using the bottom of a glass to press the crumbs gives you a much smoother, more even crust than your fingers alone. And when you whip the cream, stop at soft peaks — stiff, over-whipped cream looks less elegant and can turn grainy, while soft, billowy cream drapes beautifully over the pie.
Finally, slice with a sharp, thin knife dipped in hot water and wiped clean between each cut. This gives you clean, beautiful wedges with no filling dragged across the plate. The pie is at its best served cold, straight from the fridge, so keep it chilled until the moment you serve it, and return any leftovers to the fridge promptly.
Variations to Try
For a no-bake version, skip the oven entirely: press the crust into the dish and chill it for thirty minutes instead of baking, then pour in the filling and refrigerate for at least six hours. The filling sets from the acid in the lime juice reacting with the condensed milk, so it will firm up without any baking at all, though the texture will be slightly softer than the baked version. This is a great option for hot summer days when you do not want to turn the oven on.
Swap the graham cracker crust for a ginger biscuit crust for a lovely warm, spicy contrast to the tart lime — simply use the same weight of crushed ginger biscuits in place of the graham crackers. A digestive biscuit crust works well too, and a chocolate biscuit crust turns the pie into something richer and more indulgent. You can also add a tablespoon of desiccated coconut to the crust mixture for a tropical note that pairs beautifully with the lime.
Change the topping to suit the occasion. A classic meringue topping, browned lightly under the grill or with a kitchen torch, turns this into a pie that looks like it came from a bakery — whisk three egg whites with sugar until stiff peaks form, pile it over the cooled pie, and brown it briefly. Or keep it simple with a dusting of lime zest and a few berries on top of the whipped cream. A thin layer of raspberry coulis drizzled over each slice adds colour and a lovely tart-sweet contrast.
For individual servings, make the pie in small jars or ramekins instead of one large dish. Press the crust into the bottom of each jar, divide the filling between them, and chill as usual — they set faster, in about three hours, and they look beautiful served straight from the jar with a dollop of cream on top. If you enjoy recipes that use a similar press-in crust technique, this easy homemade chicken pot pie without crust skips the pastry entirely and is just as comforting in a savoury way.
Serving Ideas
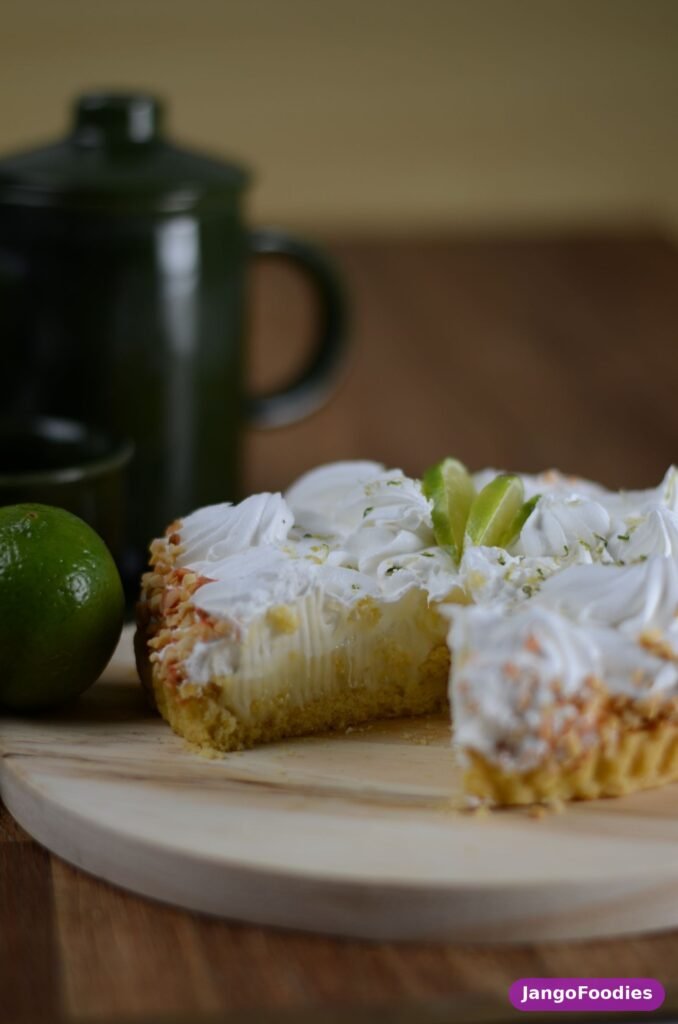
The classic way to serve key lime pie is cold, in generous wedges, with a cloud of softly whipped cream and a thin slice of lime on each piece. It is a complete dessert on its own — no sauce, no ice cream, nothing else needed. Serve it after a rich main course, when everyone wants something light and refreshing, and it will be the perfect ending to the meal. A pot of coffee or a glass of iced tea alongside is all you need.
For a summer party or barbecue, key lime pie is an ideal dessert because it can be made the day before and served straight from the fridge, leaving you free to enjoy the party instead of fussing in the kitchen. Bring it to the table in its dish, slice it there, and let guests help themselves to extra whipped cream. It pairs beautifully with grilled food and tropical flavours, and a jug of lime-spiked sparkling water or a cold beer fits the mood perfectly.
For a more formal dinner, serve individual slices on chilled plates with a drizzle of raspberry coulis and a few fresh berries, or a small pile of toasted coconut flakes. The bright green filling and white cream look stunning against a dark plate, and a single perfect lime twist on top makes it look like it came from a restaurant. However you serve it, keep the pie cold until the last moment — it is at its best straight from the fridge, when the filling is firm and the cream is cool and fresh.
Storage and Reheating
Store key lime pie in the fridge, covered loosely with cling film or in a covered container, for up to four days. It actually tastes better on the second day, once the lime flavour has mellowed slightly and the filling has set fully. Keep the whipped cream topping separate if you can — whip it fresh just before serving for the best texture — or add it to the whole pie and store it topped, in which case the cream will hold up for about two days before it starts to soften.
There is no reheating involved with key lime pie, and it should always be served cold. If the pie has been sitting out at room temperature during a meal, return it to the fridge within two hours. Slices can be stored in an airtight container in the fridge for three to four days, and they make a wonderful next-day treat with a fresh dollop of cream.
This pie freezes well for up to three months, which makes it a great make-ahead dessert for holidays and parties. Freeze the pie without the whipped cream topping, wrapped tightly in cling film and then foil, or freeze individual slices wrapped separately. Thaw overnight in the fridge, then add fresh whipped cream just before serving. The filling holds up remarkably well after freezing, though the crust will be slightly softer than fresh. For a comparison of techniques, the BBC Good Food key lime pie recipe is a solid reference, and King Arthur Baking’s classic key lime pie offers a slightly different take on the same beloved dessert.
Frequently Asked Questions
Can I use regular limes instead of key limes?
Yes, regular limes make a very good pie. Key limes are smaller, more aromatic, and a little sharper in flavour, but a pie made with regular limes is still delicious and recognisably a key lime pie. Use the same amount of juice — about 120 ml — and add a little extra zest to make up for the milder flavour. What you should avoid is bottled regular lime juice, which often tastes flat and slightly bitter compared with fresh. If you can find bottled key lime juice, that is an excellent middle ground.
Why is my key lime pie filling runny?
The most common reason is not chilling it long enough. The filling needs at least four hours in the fridge to set fully, and overnight is better. It will also be runny if the pie was underbaked — the edges should be set and the centre should wobble gently, not slosh, when it comes out of the oven. If your pie is still soft after a full night in the fridge, it may have had too much lime juice or too few egg yolks, so measure carefully next time and whisk the yolks well before adding the condensed milk.
Can I make key lime pie without baking it?
Yes. The filling sets partly through the acid in the lime juice reacting with the condensed milk, so a no-bake version works well. Press the crust into the dish and chill it for thirty minutes instead of baking, pour in the filling, and refrigerate for at least six hours. The texture will be slightly softer and creamier than the baked version, but still sliceable and delicious. It is a great option on hot days when you do not want to turn the oven on.
How do I stop the crust from crumbling?
Press the crumb mixture firmly and evenly into the dish, especially at the corners where the base meets the sides, and use the bottom of a glass to compact it smoothly. Make sure the crumbs are fine and evenly coated with butter — if the mixture feels too dry, add another tablespoon of melted butter. Baking the crust for eight to ten minutes firms it up considerably, and chilling the finished pie thoroughly before slicing helps the crust hold together when you cut into it.
Can I freeze key lime pie?
Yes, it freezes very well for up to three months. Freeze the pie without the whipped cream topping, wrapped tightly in cling film and foil, or freeze individual slices wrapped separately for easy single servings. Thaw overnight in the fridge and add fresh whipped cream just before serving. The filling holds up remarkably well, though the crust will be a little softer than fresh — still delicious, and a great way to have dessert ready for unexpected guests.
What is the difference between key lime pie and lemon meringue pie?
They are quite different desserts, though both are citrus pies. Key lime pie has a smooth, creamy filling made from condensed milk, egg yolks, and lime juice, set in a biscuit crust and topped with whipped cream. Lemon meringue pie has a sharper, more jelly-like lemon curd filling in a pastry crust, topped with a billowy meringue that is browned in the oven. Key lime pie is cooler, creamier, and less sweet-tart, while lemon meringue is brighter and more dramatic. Both are wonderful, but key lime pie is considerably easier to make. If you enjoy simple bakes with a press-in base, these small-batch cookies without baking soda are another easy win — soft, chewy, and ready in minutes.